iOS Accessibility Tutorial: Getting Started
Repost from https://www.raywenderlich.com/142058/ios-accessibility-tutorial


Developers constantly strive to make amazing, intuitive and immersive apps for users. But are developers really building for every possible user? Can everyone truly use your app to its full ability?
An accessible approach to designing apps, products or any kind of services lets people use those products — regardless of ability. This includes people with vision, motor, learning, or hearing disabilities.
Apple continues to provide developers with new and updated tools to design with accessibility in mind. Take a moment to watch this inspiring introductory video from Apple (8 mins).
In this iOS accessibility tutorial you will start off with a finished recipe app and transform it to become more accessible. You will learn the following:
- How to use VoiceOver.
- How to use the Accessibility Inspector.
- How to use the accessibility elements with UIKit.
- How to build a better user experience for people with disabilities.
This iOS accessibility tutorial requires Xcode 8 and Swift 3. It assumes you already know the basics of Swift development. If you’re new to Swift, you should first check out our book Swift Apprentice.
Note: You’ll need a physical device to work with VoiceOver — this accessibility feature is not supported in the simulator.
Getting Started
The app you will be enhancing is a simple recipe app, which shows you the difficulty level of each recipe and lets you rate what you made.
Start by downloading the starter project. Open Recipe.xcodeproj in the Recipe folder. Before you can run on a device, you need to configure signing.
Click on the Recipe project in the navigator, then select the target with the same name. Select the Generaltab and in the Signing section select your Team from the drop down.
Now build and run the app to become familiar with its features. The root controller is a table view of recipes containing an image, description, and difficulty rating. Click into a recipe for a larger picture with the recipe’s ingredients and instructions.
To make things more exciting, you can also cross off the items in the list to make sure you are on top of your cooking game! If you love or hate what you made, you can even toggle the like/dislike emoji.
Spend a few minutes becoming familiar with the code in the starter. Here are some highlights:
- RecipeInstructionViewController.swift contains the controller code for the detail view that shows a large image of the dish along with ingredients and instructions for cooking. You use a UISegmentedControl to toggle between recipes and instructions in the table view backed by
InstructionViewModel. - InstructionViewModel.swift acts as the data source for
RecipeInstructionsViewController. It includes descriptions for ingredients and instructions as well as state information for the check boxes. - RecipeCell.swift is the cell for the root controller’s recipe list. It handles display of the recipe’s difficulty level, name and photo based on the passed
Recipemodel object. - Recipe.swift is the model object representing a recipe. It contains utility methods for loading an array of recipes that is used throughout the app.
- InstructionCell.swift defines a cell that contains a label and checkbox for use in instructions and ingredient lists. When the box is checked, it adds a strikethrough to the text.
- RecipeListViewController.swift manages the root table view which displays the list of all recipes available using an array of
Recipeobjects as the data source. - Main.storyboard contains all storyboard scenes for the app. You will notice that all UI components are standard UIKit controls and views. UIKit controls and views are already accessible – making your job easier.
Now that you have an understanding of how the app works, you’ll begin to add some accessibility features.
Why Accessibility?
Before you get started with the code, it’s important to understand the benefits of accessibility.
- Designing your app for accessibility makes it easier to write functional tests, whether you’re using the KIF framework, or UI Testing in Xcode.
- You’ll also broaden your market and user base by making your app usable by a larger group.
- If you work for any government agencies, you’re required to implement 508 compliance, which states that any software or technology must be accessible to all users.
- Plus, it plain feels good to know you’re making a small but noticeable difference in someone’s life! :]
Enabling VoiceOver
The VoiceOver screen-reading tool included with iOS helps users interact with software without the need to see the screen. It’s specifically designed for those with vision problems.
VoiceOver is the link between the UI and the user’s touch input, and provides audible descriptions of different UI components and audible feedback on actions taken in the app.
To start using VoiceOver, first open the Settings app and navigate to General\Accessibility\Accessibility Shortcut. There, ensure the VoiceOver cell is selected.

This creates a shortcut so you can triple-click the home button on a physical device to toggle VoiceOver on and off. Imagine the time you’d waste toggling this setting without the shortcut! :]
There are many different accessibility features including VoiceOver, Invert Colors, Color Filters, Reduce White Point, Zoom, Switch Control and a lot more. You will only be focusing on VoiceOver in this iOS accessibility tutorial.
How to use VoiceOver
Now that you know how to enable VoiceOver, a brief overview of the feature is in order. Below is a summary of some of the more common gestures:
- Single tap anywhere on the screen and VoiceOver will speak identifying information from the item’s accessibility attributes — more on this shortly.
- Single swipe left or right and VoiceOver will navigate through visible accessibility items while reading them out loud. Right swipes move forward and down, while left swipes do the opposite.
- Single swipe down to spell out the focused item letter-by-letter.
- Double tap to select the item with focus.
- Three finger swipe left or right to navigate forwards or backwards in a page view.
It’s time to see how smoothly your app works with VoiceOver.
Using VoiceOver
Build and run the app on a physical device, and triple click the home button. Swipe left and right to navigate through the recipe list. VoiceOver reads the elements starting from top left to bottom right. It starts with the header name followed by each recipe name and the name of the associated image.
Do you notice anything wrong with the VoiceOver experience?
- “Image” is not a very helpful description of the image views in each cell. This tells someone that something is there, but doesn’t actually describe it!
- VoiceOver says nothing about the difficulty level of each recipe, rendering this feature useless for VoiceOver users.
With the problem areas identified, it’s time to fix them!
Accessibility Attributes
Accessibility attributes are the core component you must implement in order to support accessibility. VoiceOver uses the attributes to supply users with audible information about displayed elements in your app.
An accessibility attribute has four properties:
- Label: A concise way to identify the control or view. Some examples are “back button” and “recipe image.”
- Traits: Describe the element’s state, behavior or usage. A button trait might be “is selected.”
- Hint: Describes what action an element completes. For example, “Displays the recipe detail.”
- Frame: The frame of the element within the screen, in the format of a
CGRect. VoiceOver speaks the contents of theCGRect. - Value: The value of an element. Just imagine using a progress bar or a slider. The current value might read “5 out of 100.”
Most UIKit components have these attributes already set for you; you simply need to supply the information in the right manner for the user experience. You’ll have to supply most of the attributes for any custom controls you create.
Note: The Recipe app only uses standard UIKit views and controls, which are already accessible and, at most, require modification to the attribute strings. For projects with custom elements, be sure to read Apple’s Making Your iOS App Accessible.
Accessibility Inspector
While fixing these issues, you’ll use a brand-new tool shipped with Xcode 8: the Accessibility Inspector. The inspector does the following:
- Runs through your app and finds common accessibility issues.
- Lets you check the accessibility attributes of UI elements in Inspection Mode.
- Provides live previewing of all accessibility elements without leaving your app
- Supports all platforms from macOS, iOS, watchOS, and tvOS
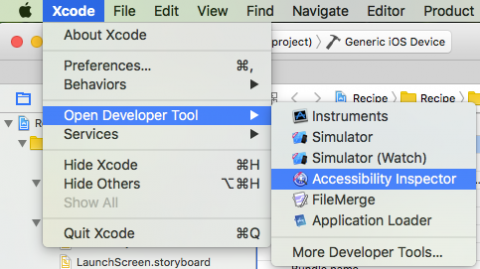
It’s time to take a look at the tool. In the Xcode menu, navigate to Xcode\Open Developer Tool\Accessibility Inspector.
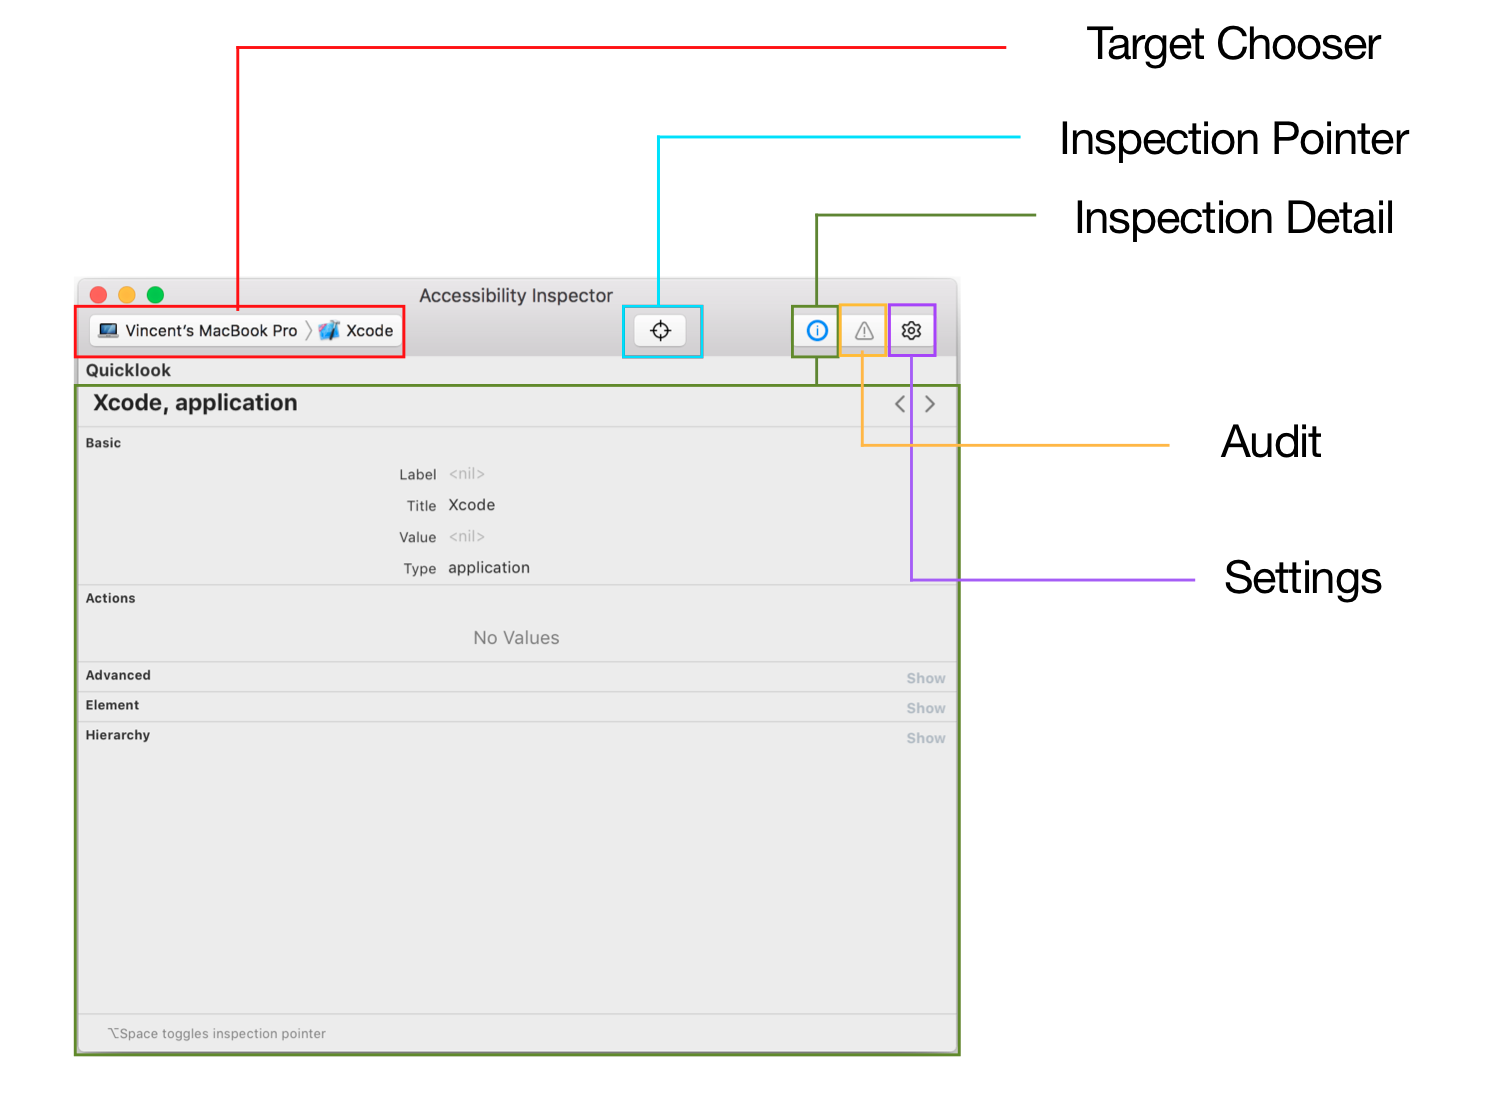
The inspector should look something like this, depending on your selections:
The target chooser lets you pick which device you would like to inspect. This could be your MacBook Pro, iOS device, or your simulator.
The fact that this inspector can provide live previews of accessibility elements makes it possible to do some useful testing in the simulator. Since live previews are much faster than listening to VoiceOver, this is where you’ll do the bulk of your work during this iOS accessibility tutorial.
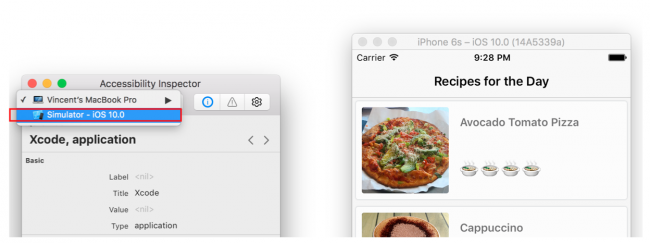
Build and run Recipe in a simulator, and change the Accessibility Inspector target to your simulator like so:
Inspection Pointer
Selecting the Inspection Pointer, pictured as a reticle sight in the inspector UI, is similar to enabling VoiceOver on your device. When you activate the pointer, you can hover over any UI element to check its attributes. Interacting with the simulator directly via button presses will deactivate the inspection pointer.
The Inspection Detail pane has everything you need to review and interact with the accessibility attributes in your app:
- Basic: Displays the attribute properties for the currently highlighted element.
- Actions: Lets you perform actions, such as tapping a button or scrolling the view. Pressing the Perform button in this pane will perform the action on your target.
- Element: Displays the Class, Address, and Controller of the current item. As of this writing, it doesn’t seem to work consistently.
- Hierarchy: Displays the view hierarchy for the element, making it easier to understand complex view hierarchies.
This removes the time overhead involved with running your app on a device and using VoiceOver.
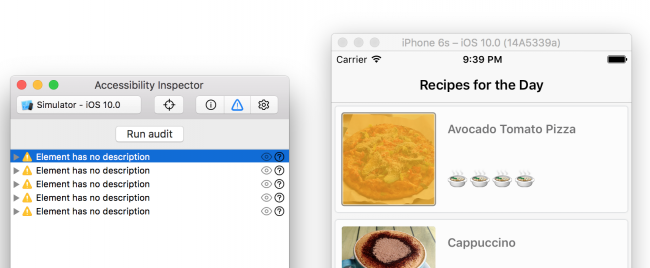
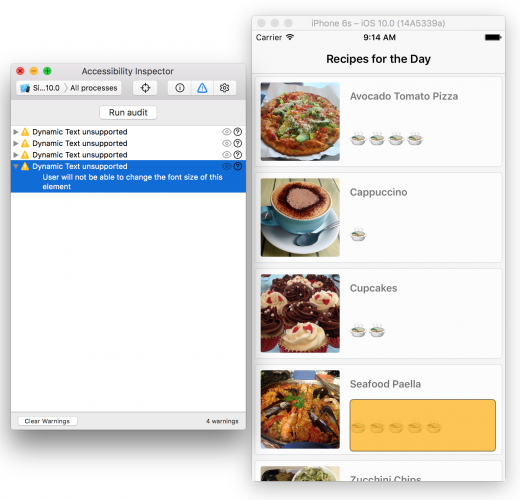
Inspector Audit
Make sure the simulator is still running and you’re on the recipe list. In the inspector, click on the Auditicon and hit Run audit. You will immediately notice that the inspector has found some elements that lack description. When you click a warning, the related element will be highlighted on the simulator. In this case, the image views associated with the cells have no description.
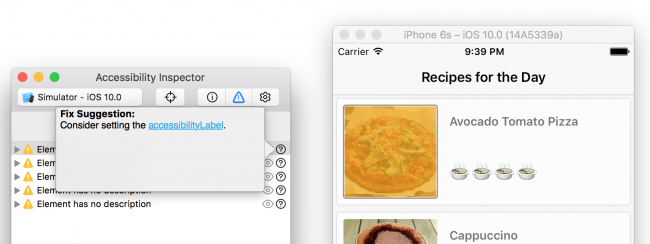
If you click the question mark (?) for one of the warnings, the inspector gives you suggestions how to fix the issue. You’ll act on this suggestion in just a bit.
You can click the eye icon to take a snapshot of the app — this is useful for anyone in quality assurance who needs to create accurate bug reports.
Inspector Settings
The Accessibility Inspector also lets you test the following Accessibility settings:
- Invert Colors
- Reduce Transparency
- Reduce Motion
- Change Font size
You no longer have to keep going back to Settings app to enable these features. The Accessibility Inspector is currently limited to these four options, but I believe Apple plans to add more in the future.
Although you can do a lot from the Accessibility Inspector, you should still test VoiceOver manually to see the actual user experience.
Making the Recipe App Accessible
Recall that the audit tool showed that the image view didn’t have an accessibility label. You noted this same issue when testing on your device with VoiceOver — the description of “Image” just wasn’t very useful.
In Xcode, open RecipeCell.swift and add the following code to the very bottom of the file:
// MARK: Accessibility
extension RecipeCell {
  func applyAccessibility(_ recipe: Recipe) {
    foodImageView.accessibilityTraits = UIAccessibilityTraitImage //1
    foodImageView.accessibilityLabel = recipe.photoDescription //2
  }
}
This code will fill in the missing accessibility properties based on the
Recipe object for the cell. Here’s how it works:accessibilityTraitstakes a mask of traits that characterize the accessibility element. In this caseUIAccessibilityTraitImageindicates it is an image.- The
accessibilityLabelis used to describe the element in VoiceOver. Here it is set torecipe.photoDescription, which is a string that describes the contents of the image.
Find
configureCell(_:) in the RecipeCell class. Add the following line to the end of the method:applyAccessibility(recipe)
Every time you create a cell, the accessibility attributes will be applied to the image using properties in the recipe object.
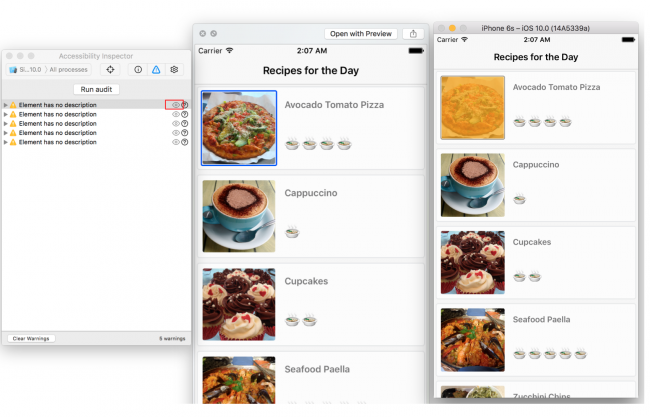
Build and run on your device, and enable VoiceOver with three clicks on the home button. Test the recipe list to see if the image descriptions are more meaningful:
Isn’t that much better? Instead of simply hearing “Image”, which provided no specific details, you now hear a full description of the image. The user can now visualize the food, instead of being frustrated at not knowing what the image is!
Run the Accessibility Inspector, and either rebuild in the simulator or switch the target in the Accessibility isnspector to your device.
Navigate to the recipe list on the target device. Make sure you clear all warnings in the inspector and hit Run Audit.
Woot — no warnings! After successfully adding descriptions to the images, the core of this view is now fully accessible.
Now it’s time to make the difficulty level of a recipe accessible.
Accessibility for Difficulty Label
Even though the audit produced no warnings, the difficulty label is still invisible to a vision impaired user. You need to identify the label as accessible and update its properties to provide a meaningful description.
Within RecipeCell.swift, add the following to the end of
applyAccessibility(_:):difficultyLabel.isAccessibilityElement = true //1
difficultyLabel.accessibilityTraits = UIAccessibilityTraitNone //2
difficultyLabel.accessibilityLabel = "Difficulty Level" //3
switch recipe.difficulty { //4
case .unknown:
difficultyLabel.accessibilityValue = "Unknown"
case .rating(let value):
difficultyLabel.accessibilityValue = "\(value)"
Here’s some more detail on what this code does:
isAccessibilityElementis a flag that makes the item visible to accessibility features whentrue. For most UIKit classes the default istrue, but for UILabel it isfalse.accessibilityTraitshelps characterize the accessibility element. There is no interaction needed, so you simply set it as having no traits.- Next, you have VoiceOver concisely identify the intent of this label.
"Difficulty Level"lets the user know exactly what this is for. accessibilityValuewill be read out as part of the label description. Setting the difficulty level here makes that element much more useful.
Build and run your app on a physical device, triple tap the home button to enable VoiceOver, and swipe through the recipe list.
Now as the user scrolls through the different accessibility elements, the cells are fully descriptive, including the difficulty level.
Checking for Warnings Again
Every time you expose a new accessibility element, it’s a good idea to run the audit again.
Start the Accessibility Inspector if it isn’t already running. Run the app on your device or the simulator, and set the inspector target accordingly. Now select the audit toggle button and hit Run audit.
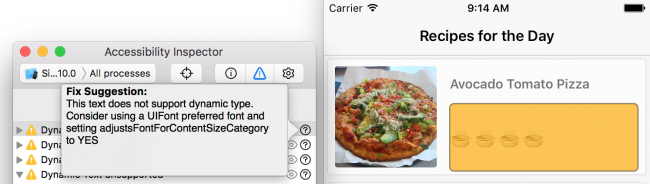
More warnings appeared! The inspector is complaining about the difficulty label not supporting dynamic text. This warning wasn’t available the first time you ran the audit because you hadn’t yet made the label visible to accessibility.
Click the question mark icon (Fix Suggestion):
Dynamic type is important to accessibility, as users with non complete vision impairment will often increase font size for readability. Non dynamic font types do not allow this.
Within RecipeCell.swift add the following code inside
applyAccessibility(_:) at the very bottom:difficultyLabel.font = UIFont.preferredFont(forTextStyle: .body)
difficultyLabel.adjustsFontForContentSizeCategory = true
This sets the
preferredFont to a body style which means iOS will style this as it would the body of a document. The specifics of the size and font are dependent on accessibility settings. adjustsFontForContentSizeCategory is a new property in iOS 10 that indicates the font should update automatically when the user changes the text content size.
Testing how your app handles resizing fonts is easy — with a little help from the Accessibility Inspector.
Build and run the recipe app alongside the Accessibility Inspector. Navigate to the Settings toggle in the inspector and experiment with some of the tools:
- Invert Colors to preview what your interface looks like with that accessibility feature. Invert colors is used by those with light sensitivities, poor vision, and in some cases color blindness.
- If the user can’t see very well, you can also test out dynamic font size changes in real time.
Your testing probably looks a lot like this:
The inspector tool makes testing accessibility cases an easy task. From this, you can tell that the recipe list will work well for users with visual impairments.
Note: There is a bug in Xcode 8 that prevents Accessibility Inspector from clearing Dynamic Text warnings when using preferredFont(forTextStyle:) in code. If you want to clear the Audit warnings, you can set difficultyLabel’s font to “Body” in Main.storyboard.
Recipe Detail Screen
Now that the list is taken care of, it’s time to look at the detail view.
Run the app on your device, enable VoiceOver and look around the detail view.
Did you notice the following issues with VoiceOver interaction?
- Left arrow button isn’t a great description for the navigation button. How would the user know what the button does? Maybe Back Button would better indicate the associated action.
- The emoji face states are described as heart shape eyes and confounded face. This doesn’t convey the resulting action intended by the button.
- The checklist reads icon empty when selected, which doesn’t tell the user much. It’s important here to explain what the state of the control means, rather than what it looks like.
Open up RecipeInstructionsViewController.swift and add the following to
viewDidLoad after assert(recipe != nil):backButton.accessibilityLabel = "back"
backButton.accessibilityTraits = UIAccessibilityTraitButton
Instead of “left Arrow button”, VoiceOver will now say “back button”.
In the same file, replace the contents of
isLikedFood(_:) with the following:if liked {
likeButton.setTitle(" ", for: .normal)
likeButton.accessibilityLabel = "Like"
likeButton.accessibilityTraits = UIAccessibilityTraitButton
didLikeFood = true
} else {
likeButton.setTitle("
", for: .normal)
likeButton.accessibilityLabel = "Like"
likeButton.accessibilityTraits = UIAccessibilityTraitButton
didLikeFood = true
} else {
likeButton.setTitle(" ", for: .normal)
likeButton.accessibilityLabel = "Dislike"
likeButton.accessibilityTraits = UIAccessibilityTraitButton
didLikeFood = false
}
", for: .normal)
likeButton.accessibilityLabel = "Dislike"
likeButton.accessibilityTraits = UIAccessibilityTraitButton
didLikeFood = false
}
For both like and dislike modes, you’ve added an
accessibilityLabel that’s clear about what the button does. You also set accessibilityTraits to identify it as a button, clarifying how the user can interact with it.
Build and run on a device and enable VoiceOver. Navigate using VoiceOver to the detail recipe screen to test your changes to the buttons at the top of the view.
Clear, short intents that the user can understand! Much better.
The final issue is with the checklist. VoiceOver currently states “icon empty” followed by the instruction. What does this mean? It’s not clear at all!
Open InstructionCell.swift and look for
shouldStrikeThroughText(_:). Replace the entire if strikeThrough struct with the following:checkmarkButton.isAccessibilityElement = false //1
if strikeThrough {
descriptionLabel.accessibilityLabel = "Completed: \(text)" //2
attributeString.addAttribute(NSStrikethroughStyleAttributeName, value: 2, range: NSMakeRange(0, attributeString.length))
} else {
descriptionLabel.accessibilityLabel = "Uncompleted: \(text)" //3
}
Here’s what this code is doing:
- Turns off the checkmark button’s accessibility so that it won’t be described independently.
- The
accessibilityLabelfor the description now uses the hardcoded string"Completed"followed by the text to provide all necessary info with a single visit to the label. - Just as with the completed code, if a user marks an item as uncompleted, you add
"Uncompleted"before the label description.
The reason for turning off the checkmark button’s accessibility is so the cell reads as one unit, instead of two different accessibility elements. Check out the final app and see how it sounds!
Sounds great — and it will be music to the ears of your users. :]
Where to Go From Here?

You can download the completed project here.
In this iOS accessibility tutorial you learned about VoiceOver and how to perform manual auditing by actually scrolling through every accessible element, and see the user experience yourself. You then used the Accessibility Inspector to perform audits, look at accessibility element values, and perform live dynamic changes to invert colors or change the font size.
You are now equipped with the necessary tools to conquer the world of accessibility. Knowing you will have a positive impact on someone’s life is a rewarding experience.
There are a ton of possibilities with accessibility features; this iOS accessibility tutorial only scratches the surface to get you started.
One thing to take a look at is Speech Recognition. Sam Davies has recorded some great screencasts related to this topic. Imagine displaying transcribed text on a user’s device while someone else speaks — the ultimate accessory for users with a hearing impairment.
Below are more resources about accessibility that I encourage you to check out:
- Categories of Accessibility
- Accessibility Development Resources
- UI Testing in Xcode
- Applying Accessibility to Custom Views
- Disability and Innovation: The Universal Benefits of Accessible Design
- What’s new with Accessibility
If you have any comments or questions on this iOS accessibility tutorial, please join the discussion below!

Comments
Post a Comment